The brand new Raspberry Pi Compute Module 4 (CM4) was just released! Surprised? Nope, and we’re not either — the Raspberry Pi Foundation had hinted that it was going to release a compute module for the 4-series for a long while.
The form factor got a total overhaul, but there’s bigger changes in this little beastie than are visible at first glance, and we’re going to walk you through most of them. The foremost bonuses are the easy implementation of PCIe and NVMe, making it possible to get data in and out of SSDs ridiculously fast. Combined with optional WiFi/Bluetooth and easily designed Gigabit Ethernet, the CM4 is a connectivity monster.
One of the classic want-to-build-it-with-a-Pi projects is the ultra-fast home NAS. The CM4 makes this finally possible.
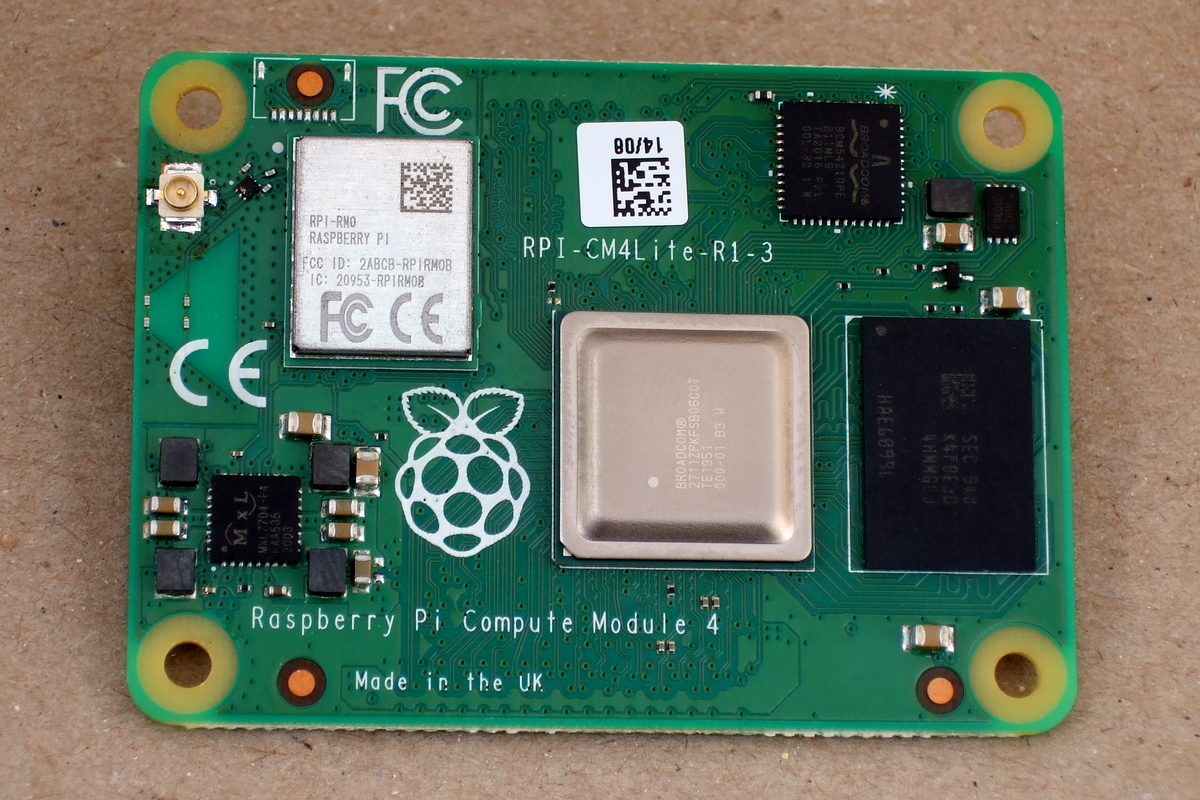 If you don’t know the compute modules, they are stripped-down versions of what you probably think of as a Raspberry Pi, which is officially known as the “Model B” form-factor. Aimed at commercial applications, the compute modules lack many of the creature comforts of their bigger siblings, but they trade those for flexibility in design and allow for some extra functionality.
The compute modules aren’t exactly beginner friendly, but we’re positively impressed by how far Team Raspberry has been able to make this module accessible to the intermediate hacker. Most of this is down to the open design of the IO Breakout board that also got released today. With completely open KiCAD design files, if you can edit and order a PCB, and then reflow-solder what arrives in the mail, you can design for the CM4. The benefit is a lighter, cheaper, and yet significantly more customizable platform that packs the power of the Raspberry Pi 4 into a low-profile 40 mm x 55 mm package.
So let’s see what’s new, and then look a little bit into what is necessary to incorporate a compute module into your own design.
So Long, SO-DIMM
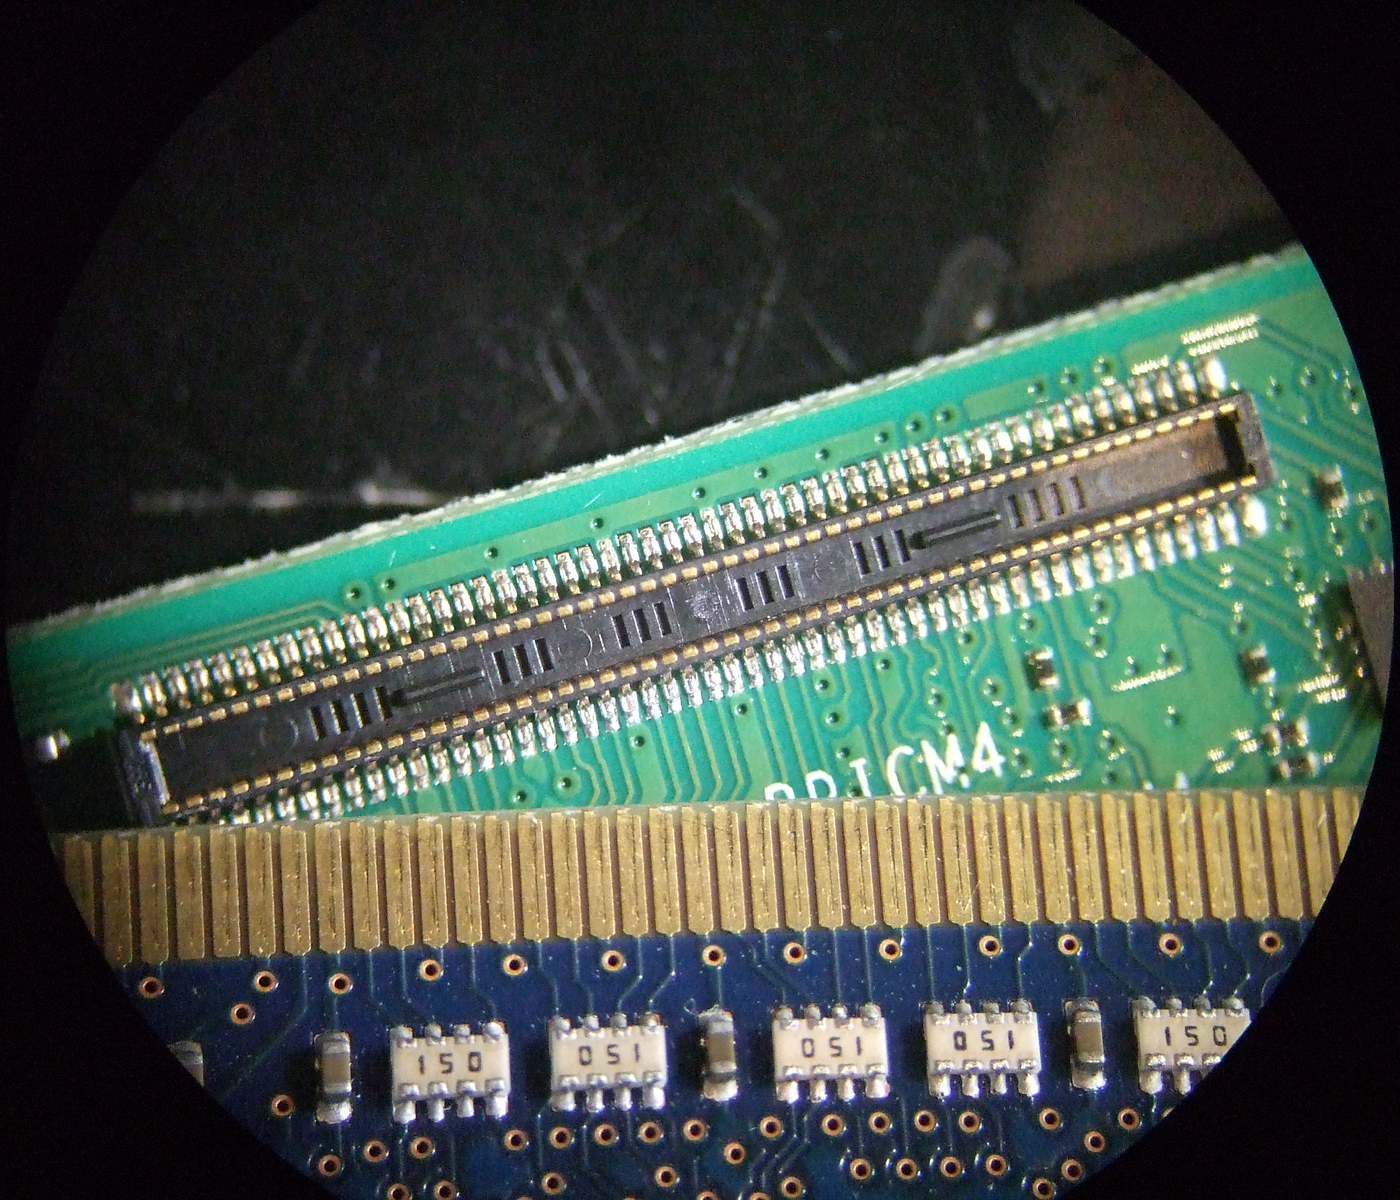
The biggest shocker with the CM4 is the new connector. Ever since the first Raspberry Pi got its compute module, they have come with 200-pin SO-DIMM connectors, just like DDR2 memory boards for a laptop. The CM4 changes that, opting for two high-speed, high-density 100-pin mezzanine connectors. Breaking with tradition is traumatic, and we know that some of you will be left with a closet-full of SO-DIMM sockets, but they did it for a good reason.
 The system-on-a-chip (SOC) that the Pi 4 family uses, the Broadcom BCM2711, brought a lot more peripheral capability to the party (PDF). As a result of this, the Pi 4 Model B picked up a second HDMI connector, USB 3.0, and Gigabit Ethernet. But it was capable of even more! For instance, it wasn’t long before enterprising hackers realized that the USB 3.0 was on a PCIe bus and swapped out the USB 3.0 for PCIe. This was doable, but difficult, with some intricate on-board rework.
The compute modules exist to make all of the SOC’s capabilities easily available to the designer. Packing PCIe alongside twin HDMI and other high-speed peripherals into the old SO-DIMM connector was just not possible, and this was hinted at by the Raspberry engineers in the summer. Hence the new connectors: Hirose DF40C-100DS-0.4V if you’re already getting itchy board-design fingers.
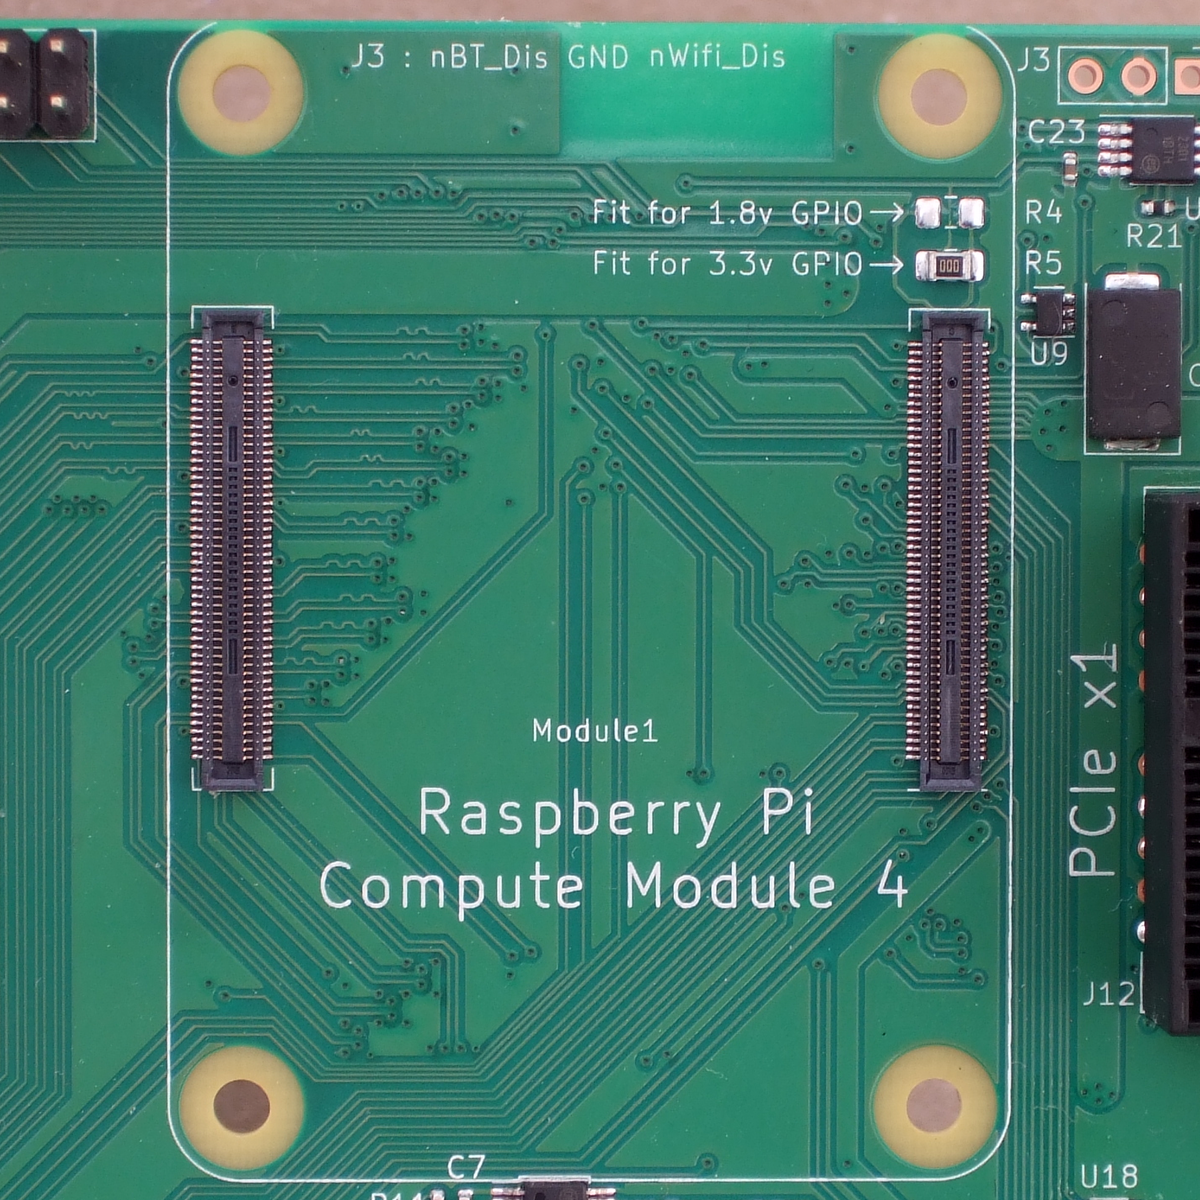 With two mezzanine connectors in place of a single SO-DIMM, the CM4 design implements a nice split between the low-speed and high-speed peripherals. One side has the traditional Raspberry Pi GPIOs, power, SD card interface, and Ethernet. The other side takes care of PCIe, USB, HDMI, and the MIPI CSI camera and DSI display lines, two of each. On one hand, that means you have a lot more high speed IO to play with, and on the other, you could get by with a simple one-connector design if you didn’t need any of the high-speed stuff.
The new connectors also allow a smaller footprint for the module, and lower board height and weight when it’s installed in your device. They implement a better separation of the high-speed and low-speed domains, so they’ll be easier to lay out. Heck, they even cost less for the pair than the old SO-DIMM socket did. And given that this is the tradeoff for PCIe, we’re not lamenting the change in the slightest.
32 Flavors: Buy Just the Pi You Need
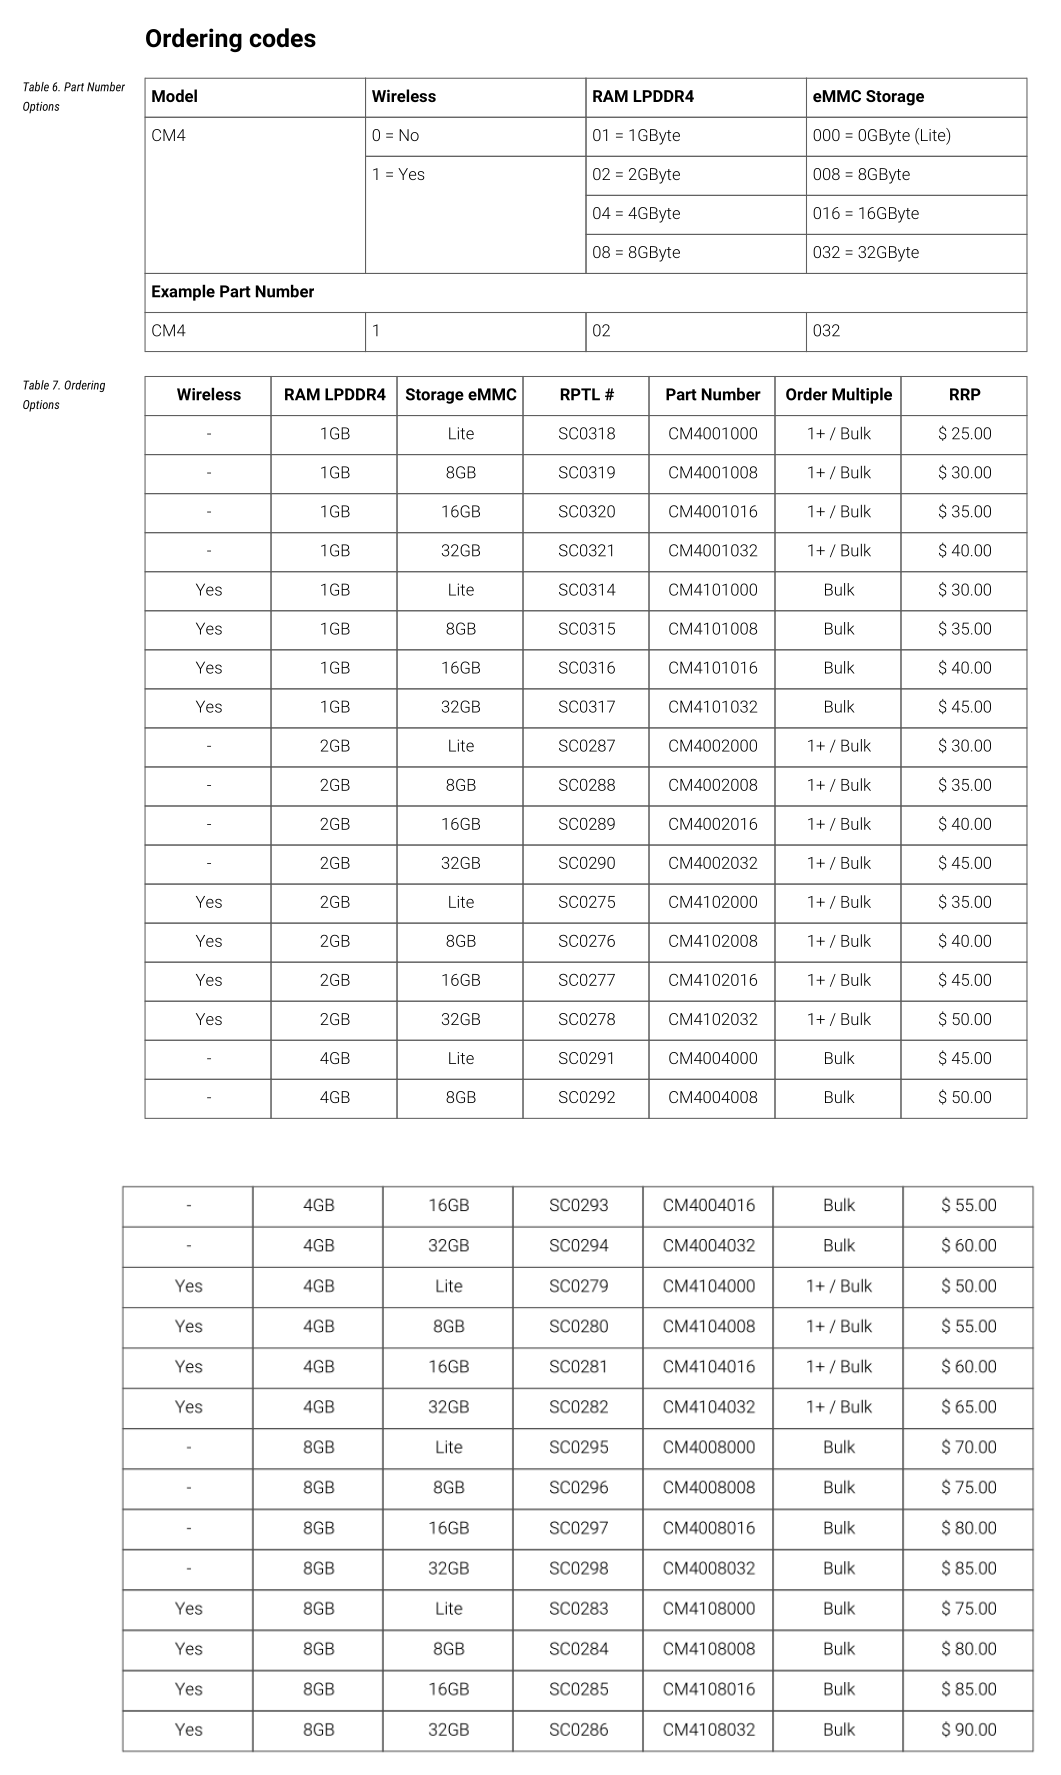
The CM3 had more ordering options than the CM2, and the Pi 4 Model B had more memory configuration options than the Pi 3 Model B. But the CM4 takes the cake. There are 32 different varieties, at correspondingly different prices. Why? There are four tiers of RAM, four tiers of on-board eMMC storage, and the optional wireless module. (4 x 4 x 2 = 32.) Let’s start off with the base model: a CM4 with no wireless, 1 GB of RAM, and no eMMC. That’ll cost you $25.
For the rest of the options, it’s like pizza toppings. An extra $5 gets you wireless. For $5 per tier, you can add 8 GB, 16 GB, or 32 GB of eMMC. To get a board with 2 GB of RAM costs $5, 4 GB costs $20, and 8 GB costs $45.
A quick quiz: how much is a CM4 Lite (no eMMC) with WiFi and 4 GB of RAM? We get $50. CM4 with wireless, a beefy 32 GB eMMC, and 2 GB RAM? Also $50. A Pi with everything (wireless / 32 GB eMMC / 8 GB RAM)? $90.
Some possible configurations are listed in the datasheet as being “Bulk” while others as “1+/Bulk”, so it might be that they’re not all equally easily available to the smaller user. For instance, if you want wireless in quantity 1, you may be limited to 2 GB or 4 GB RAM configurations. All tiers of eMMC are equally available, however. Since this can all change depending on customer demand in the long run, you might want to check out the Raspberry Pi website for the latest.
Plus PCIe, Minus USB 3.0
Compared with the Pi 4 Model B, the CM4 is drastically more flexible. The headline difference is that the CM4 no longer dedicates the PCIe bus to USB 3.0. This choice made sense for a consumer-oriented board, but the CM4 is for designers. PCIe can be added very simply to a CM4 design: all you need is the right socket and 3.3 V and 12 V power rails. And this has even been tested with the newer NVMe solid-state drives. Raspberry engineer Dominic Plunkett told us that they were getting 390 MBytes/s write speed in the lab, which is pretty close to the theoretical maximum speed. You’re trading this for the USB 3.0 port of the Model B, but if what you’re after is fast SSD I/O, PCIe with NVMe is the cutting edge. Not bad for a single-board computer!
The Model B only has one two-lane MIPI CSI camera connector and one two-lane MIPI DSI display connector broken out. The CM4 allows two of each, enabling stereoscopic 3D imaging, for instance. (You could also do this with the the CM3+, but that’s old and busted as of right now.) Moreover, the Model B exposes only the two-lane versions of CSI and DSI, while the CM4 additionally gives you four-lane variants for higher bandwidth. Using these, you can get even higher performance out of the camera without resorting to external hardware. Want ultra-high frame rate or resolution video on DSI screens? CM4.
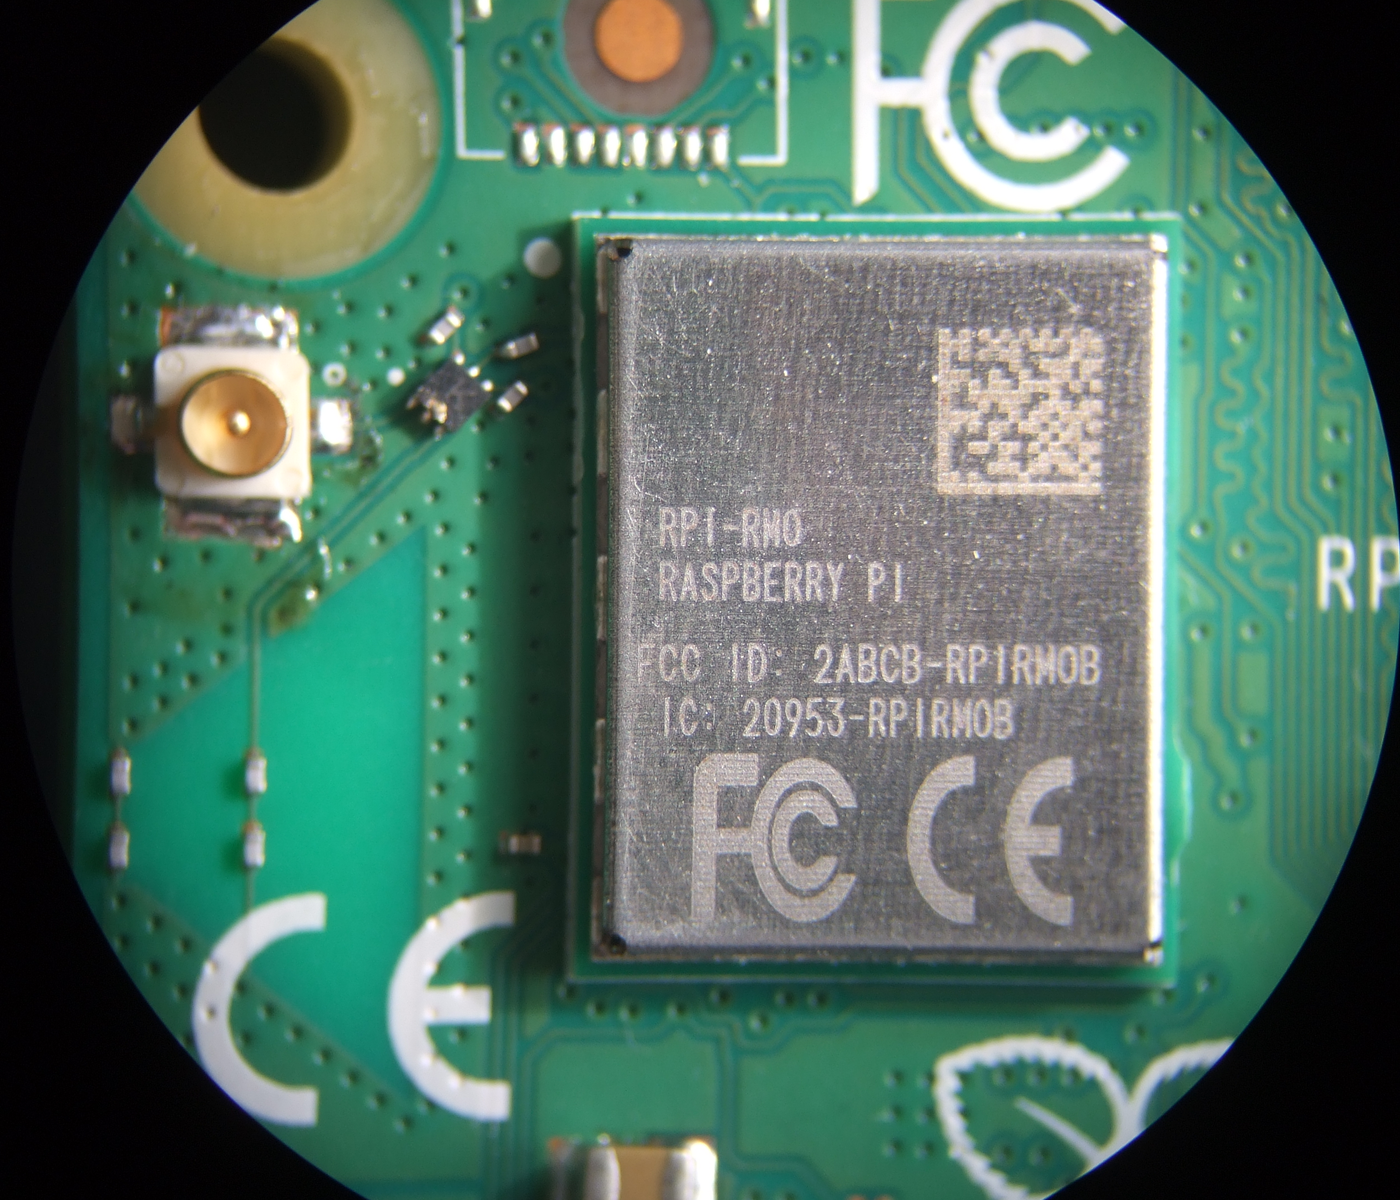 Even the optional WiFi/Bluetooth module is more flexible. In addition to the onboard PCB antenna, they’ve added a UFL connector for an external antenna, and both the internal and external antennas can be enabled or disabled from software as needed. This makes the CM4 the right choice for demanding WiFi applications, or simply for building inside a metal box. The Raspberry Pi Foundation will sell an antenna that’s FCC certified for use with the CM4, or you can bring your own but then it’s on you.
Last, the Ethernet chip got a tiny upgrade, to the BCM54210PE on the CM4. It’s still a Gigabit Ethernet PHY chip, but this one also supports IEEE 1588 Precision Time Protocol. If you need better-than-NTP time sync, you know what all of this means.
Open Questions
We noticed two things that made us curious while working over the CM4 datasheet with our fine-toothed comb.
First, it says that the CM4 is more efficient than the Model B, so it uses less power. But because it’s on a smaller board, it’s not passively heatsinked as well as the Model B, and it may still be more prone to throttling down the CPU speed to keep from overheating. There are no numbers available yet, but we’re going to get our hands on a Model B and put the two to a stress-test comparison soon. Stay tuned.
Second, there’s a tantalizing sentence about two analog inputs that were left over on the MXL7704 power-management IC, and you’re referred to the datasheet (PDF) for further study. They seem to be broken out in pins labelled AIN0 and AIN1 on the official IO board. Looks to us like the gauntlet has been thrown.
Finally, sometimes flexibility conflicts with ease-of-use. The Model B comes with a total of four USB ports: two USB 3.0 and two USB 2.0. USB 3.0 got axed, and the CM4 only has connections for one USB 2.0 port, because that’s what the Broadcom SOC supports natively. If you want more USB ports, you’ve got to build your own hub. That’s what they did on the Model B, and it’s also what they did on the CM4 IO demonstration board. And speaking of the IO board…
Getting Started: The IO Demo Board

We got an IO board delivered along with our sample CM4. With solid documentation as well as KiCAD design files available, it’s basically a template for making your own CM4-based design. Have a look!
We’re impressed by how little is needed to get all of the functionality of the CM4 out into the real world. The HDMI ports are simply wired straight from connector to connector, as are the MIPI camera and display lines. Ethernet is implemented with power-over-Ethernet protection, but if you didn’t need that, you could just wire straight from the CM4 to the magnetics. (Or to an optical transceiver?) PCIe is similarly simple: outside of 3.3 V and 12 V power rails, everything is straight from the CM4 into the socket.
Indeed, the only parts of the IO board that look like they took any design work (no offense, RPi engineers!) are the USB 2.0 hub that allows up to four connections, which you can copy straight-up if you want a tested design, and the power supply that converts down from a 12 V barrel jack to 5 V for the CM4 and to 3.3 V for the PCIe connector. The SD card, to accomodate the no-eMMC “Lite” version of the CM4, has a high-side switch so that it can be turned off by the CM4 to save power when not in use. Everything else is simply wires.
But they’re not necessarily simple wires, and this is the one gotcha for people who haven’t designed high-speed boards. There are basically two classes of traces with which you need to be careful: 90 Ω differential pairs and 100 Ω differential pairs. The first group includes PCIe and USB, and within pair they need to be matched down to 0.15 mm, with 0.1 mm recommended for PCIe. 100 Ω pairs are specified for Ethernet, HDMI, and the MIPI CSI and DSI connections.
According to the datasheet, across-pair lengths are significantly less critical, but between two lines in a differential pair, it pays to match lengths. KiCAD does differential pairs since CERN added it in 2015, and Saturn PCB toolkit comes highly recommended for calculating impedance-controlled trace widths, but it’s Windows only. (You might be able to just crib the trace widths and separations off the IO board design and ignore this whole issue.)
Of course, you don’t need all of these high-speed peripherals unless you need them. You could run a CM4 server with eMMC and wireless using just the 5 V and GND pins, assuming you had a way to get the software into the eMMC in the first place. For the classic headless-Pi experience, you could wire up the GPIO and SD card lines as well, all without worrying about impedances. (Note that you could do this using only the low-speed mezzanine connector. Nice.)
But that’s not why you’re here. You want to turn the IO board reference design into that high-speed custom PCIe NAS, remember? Off you go! Just remember to design in plenty of status LEDs.
Wrapup
In conclusion, the CM4 is everything the Raspberry Pi 4 Model B is, except in a more flexible, less consumer-friendly package. It comes in 32 different varieties, and exposes some seriously high-end peripherals, which is all the more impressive for the low price tag. The real cost of admission is designing your own board to go along with it, but even that doesn’t look to be too bad with some help. We’re looking forward to see what you all do with it.
Recent Comments